You may define a set of parameter values that override the default
configuration by creating
a markup file. These
parameter values are applied when a markup file is
automatically selected
or the name of a markup file is specified by the
EDM
tag.
Click on the main
[File|Markup]
menu-option to open the
markup form for PDFing. Once the "open file dialog" appears,
you may select an existing file, or enter the name (
without
the extension)
of a new file. The markup form will then be displayed. Each "tab" on
the top of the form
allows you to select a particular page of this form.
Each of the
destination,
convert,
paper,
message,
security,
burst,
mail-list,
text,
graphics,
attach, fonts,
and
bookmarks
pages contain a set of related configuration options.
This document describes only the most important options on each page.
Please refer to the program help-files for detailed information.
The destination page is (almost) identical to the
equivalent page of
the configuration form,
except for the following edit-control:
- Clone tags
- Specify that the spooled-file will be "cloned",
that is one or more new jobs will be created with a copy of
the current spooled-file. One new job will be "cloned" for each
non-blank line of text in this memo control. Each line of text should
contain the tags that
control how the new job is to be processed by PDFing. For instance the
line:
EMA=dfowle@pdfing.com
EDN=newname
will cause a new job to be cloned with the specified e-mail address and
docuument name. A leading asterisk "*" character instructs PDFing to
re-use the current markup for this cloned job. By default a cloned job
is created without a specified markup. If the leading characters in any
line of text are not "tagged" they are assumed to be the name of a
markup.
If you do not want to override any particular parameter value you
should
set it to blank (if text), 0
(if a number) or * (if a selection).
The convert page is identical to the
equivalent page of
the configuration form.
If you do not want to override any particular parameter value you
should
set it to blank (if text), 0
(if a number) or * (if a selection).
The paper page is (almost) identical to the
equivalent page of
the configuration form.
However, only one set of page dimensions may be specified.
If you do not want to override any particular parameter value you
should
set it to 0
(if a number) or * (if a selection).
The message page (almost) identical to the
equivalent page of
the configuration form. The following controls have an additional
function in a markup.
- Send via server ?
- Select *ANY to
specify that any SMTP servers can send an email, select 1 to specify that
the server specified on the [System]
page must be used to send email,
select 2 to
specify that the server specified on the [SMTP2] page must be
used to send email.
- From
- Specify
an email address here which will
override the email address specified on the [System] or [SMTP2] pages.
If you do not want to override any particular parameter value you
should
set it to blank (if text), 0
(if a number) or * (if a selection).
The encryption/protection controls on the security page are identical
to the
equivalent page of
the configuration form.
If you do not want to override any particular parameter value you
should
set it to
blank (if text) or
*
(if a selection).
The digital-signature controls allow you to select a
signing-certificate
(by number) and specify the visibility and position of the signature
"widget". Please refer to our
digital-signature document
for more details.
Use the burst page to 'burst' or split one spooled-file containing one
or more distinct
documents (such as a run of invoices or purchase-orders) into as many
PDF files as there
are documents. You can elect whether to create one file, of one or more
documents,
for the same email-address or one file per document.
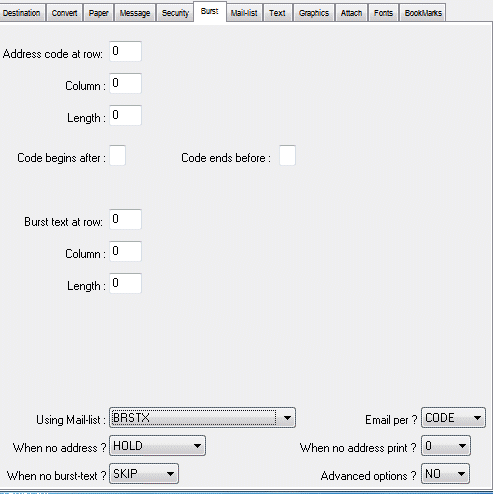
- Address Code at Row
- Specify the row of the spooled-file text that contains the
"address-code".
When a non-blank code is extracted it determines the boundary of a
group of documents.
The code may be used to look-up corresponding email address(es) entered
on the
Mail-List page or used
directly as an email address.
The special characters
&C
are replaced at run time by
this code.
- Column
- Specify the column of the spooled-file text that contains
the "address-code".
- Length
- Specify the length of the "address-code". The length should
be set
to zero, unless the code is text not
delimited by blanks or
some other specific character, as specified below.
- Code begins after
- If you need to extract the "address-code" as a sub-string
of a longer-string
you may specify the character immediately preceding the code here.
- Code begins before
- If you need to extract the "address-code" as a sub-string
of a longer-string
you may specify the character immediately following the code here.
- Burst Text at Row
- Specify the row of the spooled-file text that contains the
"burst-text".
When non-blank text is extracted it determines the boundary of each
document.
This is useful when the spooled-file contains more than one document
for the same
recipient and you want to create one file per document rather than one
file
per address.
The special characters
&B
are replaced at run time by
this text.
- Column
- Specify the column of the spooled-file text that contains
the "burst-text".
- Length
- Specify the length of the "burst-text". If the text
contains included blanks,
the length must be set to a non-zero
value.
- Using Mail List
- Specify the Mail-List
used to look-up the email addresses corresponding
to each "address-code". Leave this control blank to use the Mail-List
defined in
this markup file.
You must select the special value *NOBOOK
when the codes are already
email addresses and do not require conversion.
- Email per
- When a spooled-file is "burst" (for instance by invoice
number) into a series of invoices, the same (customer) address code may
apply to more than one of the resulting invoices. You may select *DOC
to send each invoices as an attachment in its own separate email, or
*CODE to send one email only, with several invoices
attached.
- Action when no Address
- Specify the action that PDFing should perform when no email
address is found.
Select USEDFT to specify that
un-addressed documents are sent to
the default destination defined on the Destination
page.
Select HOLD to specify that
un-addressed
documents are
HELD and require manual addressing.
Select PRINT
to specify that the document is to be printed but not emailed.
- When no address print
- Specify that PDFing should print n copies of the PDF
when no address is found for a code.
- When no burst text
- If the text string selected by the burst specifications is
all blank, then you may select NOSKIP
to make this page the first of a new document, or SKIP to
include this page in the current document.
- Advanced Options ?
- Select YES to see the
additional controls that allow
you to specify parameter values for more complex bursting tasks.
Use the mail-list page to select and maintain a list of destination
addresses.
Click on the grid to add new rows.
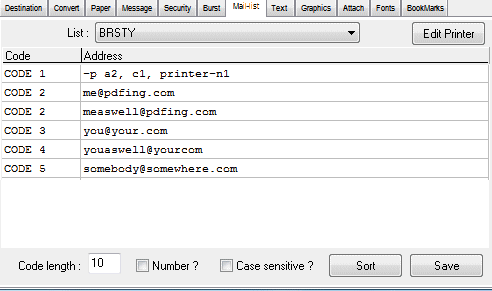
- List
-
The text shows the name of the mail-list you are editing. Click on the
down arrow to select a mail-list from a list.
- Edit printer
-
Click on this button to show the edit-printer sub-form.
This sub-form and the other printing controls
are further described in our printer
documentation. This allows you to create and edit printer addresses.
- Code
- You may enter a code with each address in order to
use this list for
addressing burst documents, or
other purposes. See the
Supported Destinations
section of our programming
document for further details.
Specify a code or number in the cells below this column-heading. You
should create one
or more rows for each value that may be used to "look-up" e-mail (or
other)
addresses.
This column will not be visible until you specify a
positive code-width below.
- Address
- Enter a single address in the cells below this
column-heading. If there is
more than one address per code you neeed to
add a new row (with
the same
code) for each different address.
- Code length
- Specify the maximum number of characters in the text
string (extracted
from the spooled-file text) used to lookup the corresponding addresses.
- Number ?
- Check this box, if the code is a number. Checking this
option will also determine
the order in which the columns are sorted.
- Case Sensitive ?
- Check this box if, when searching and sorting codes, you
need to distinguish between
codes based on their case. This control is only enabled when entering
non-numeric codes.
The default value for this control is set on the
[Advanced] page
of the configuration form.
- Sort
- Use this button to sort the codes and addresses into
alphabetic or numeric order.
- Save
- Use this button to save changed codes and addresses to
disk.
Use the numbered tabs at the top of this page to specify the position
of up to twenty-four
text-strings. For every position specified, text will be extracted from
the the first
page of the spooled-file. The extracted text-string will replace the
corresponding
special-characters
&1 - &24.
If a text-string is specified on tab number one, then this string may
also
be used to look-up the corresponding e-mail addresses in the specified
mail-list.
In order to check the positions of text on a page, you should first run
an example of
a spooled-file through PDFing, with the
Convert
to Ascii
control set to
YES. Then review the
output ASCII text file in notepad or another text editor.
- Text From Row
- Specify the row of the spooled-file text from which a text
string is to be extracted.
- Text From Column
- Specify the column of the spooled-file text from which a
text string is to be extracted.
- Text Length
- Specify the length of the text string to be extracted. If
this value is zero,
then no text-string will be extracted.
- Replace
- Select YES if you want to
replace the selected text-string
with another text-string.
- With Text
- Enter the replacement text-string here.
If this replacement text-string is longer than Text
Length,
all excess characters to the right will be discarded.
- On all pages
- Specify YES
when you want to replace the text-string on all pages of the file.
- Special characters
- Specify that the replacement text contains special characters.
- Condition set by
- Specify the condition number to be set on when the text
specified in the next edit-control matches the selected text string.
The numbered
sub-pages of the
[Graphics],
[Attach] and
[Fonts] pages also have a new
control labelled "When
condition?", this control allows you specify
the condition-number that must
be set, before the actions (as
specified on this numbered sub-page) are actually applied to a
particular page.
- Wild cards
- Specify that text in the edit-control can use wild-card characters
? and * when matching the
selected text string.
-
- Address-Code ?
- Select YES if you want to use
the extracted text-string to
look up addresses in the mail-list specified by the following control.
Only appears on the first tab.
- Using Mail List
- Specify the Mail-List
used to look-up the email addresses corresponding
to each "address-code". Leave this control blank to use the Mail-List
defined in
this markup file.
You must select the special value *NOBOOK
when the codes are already
email addresses and do not require conversion.
- When no address
- Specify the action that PDFing should perform when
no address is found for a code.
Select USEDFT to specify that
un-addressed documents are sent to
the default destination defined on the Destination
page.
Select HOLD to specify that
un-addressed
documents are
HELD and require manual
addressing. Select PRINT
to specify that the document is to be printed but not emailed.
- When no address print
- Specify that PDFing should print n copies of the PDF
when no address is found for a code.
Use the graphics page to specify any graphic images that will be placed
on each page of
a PDF document. Use the numbered tabs at the top of this page to
specify the image file
and image position of up to 24 graphic images.
The default unit-of-measure is
points
(one 72nd of an inch)
but you may select a different unit-of-measure on the
Paper page
of the configuration or markup form.
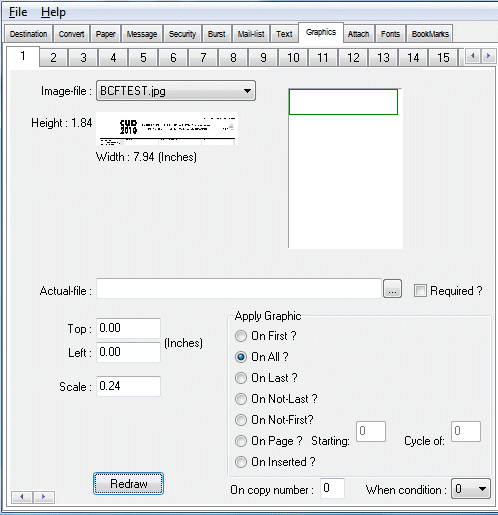
- Image File
- Use this control to select an image file. The (JPEG) image
file must be present
in the \Markup sub-directory before it
can be selected. Once you have
selected an image, you will see the "thumb-nail" below this control and
the other controls (listed below) will appear on this page. The
outline-rectangle
indicates where the image will appear on the page.
- Example Page
- On the right-hand side of this page you will see a white
rectangle,
this is the "example-page". You may double-click in this
page to position the top-left corner of the selected image, or enter
the position using the following top and top
controls.
- Actual File
- You may enter the file-name of an image that will actually
be placed on the page.
This file-name may include special-characters
, so that images may be dynamically selected at run-time, based on the
current value
of these special characters. The actual image-file should have the same
dimensions
as the one selected in the Image File control, otherwise results are
unpredictable.
- Required
- Tick this box to specify that the specified file
must exist. If un-ticked and the file specified does not exist,
then PDFing will ignore the error.
- Top
- Enter the top position on the PDF page where the top-left
corner
of this image should be placed. You will see the out-line rectangle
on the example-page move, showing the new image position.
- Left
- Enter the left position on the PDF page where the top-left
corner
of this image should be placed. You will see the out-line rectangle
on the example-page move, showing the new image position.
- Scale
- Enter a scaling factor to adjust the size of this image on
the PDF page.
You will see the out-line rectangle on the example-page enlarge or
shrink, to reflect the new image size.
- Redraw
- Click on this button for visual confirmation of the
position and size
of this image on each PDF page.
- Apply Graphic
- Specify when a graphic image should be applied
to a page.
- On First
- check this button if this
image should appear only
on the first page of the output PDF.
- On All
- check this button
if this image should appear on every page
- On Last
- check this button if this
image should appear only on the last
page
- On Not-Last -
check this button if this image should appear on
every page except the
last page
- On Not-First -
check this button if this image should appear on
every page except the
first page
- On Page
- check this button if this
image should appear on page n of a cycle of n pages.
- On Inserted
- check this button if this image should
appear on a new page inserted
automatically after
every existing page.
- Redraw
- Click on this button for visual confirmation of the
position and size
of this image on each PDF page.
- When condition
- Specfiy the condition number of the page where the image is
applied to the page, the default 0
specifies any condition number. Use the [Text] page
to set condition-numbers.
- On copy number
- Specify the copy number of the page where the image is
applied to the page, the default 0
specifies every copy number. Use the [Convert] page
to create copies of pages in the spooled-file.
Use the attach page to specify files to be attached to emails, as well
as the output PDF. If you specify a PDF file, you have
the
aditional options of "appending" a PDF to the output PDF, or
"overlaying" a PDF onto selected pages of the output PDF. Use the numbered tabs at the top of this page to
specify the file-names
and dispositions of up to 24 files. Overlaying a PDF
file is specified like the way placing an image is specified on the
[Graphics] page.
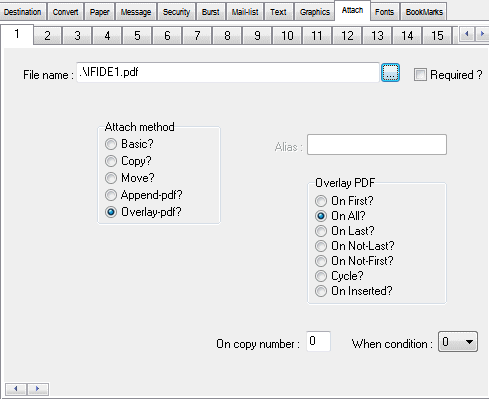
- File name
- Specify a file to attach. If the selected file is a PDF,
then you can also append or merge this file with the output PDF.
- Required
- Tick this box to specify that the specified file must exist. If un-ticked and the file specified does not exist, then PDFing will ignore the error.
- Attach method
- Specify how the file is to be processed.
- Basic
- check
this button to attach this file to email.
- Copy
-
check this button
to make a copy of this file and attach the copy of the file
to email.
- Move
- check
this button to move this file and attach this file
to email
- Append pdf -
check this button to append this PDF file after the last page
of the output PDF.
- Merge-pdf -
check this button to merge this PDF file with the output PDF.
-
- Merge PDF
- If the Merge-pdf button
is checked, you must specify when PDF page(s) are merged with pages in
the output PDF.
- On First
- check this button if the
first page of the specified PDF will only be merged with the first
page of the output PDF.
- On All
- check this button
if the first page of the specified PDF will be merged with every page.
- On Last
- check this button
if the first page of the specified PDF will only be merged with the
last
page.
- On Not-Last -
check this button if the first page of the specified PDF will
be merged with
every page except the
last page.
- On Not-First -
check this button if the first page of the specified
PDF will be merged with every page except
the first page.
- On Cycle
- check this button if all the
pages of the specified PDF will be merged, in turn, with the corresponding page
of the output PDF.
- On Inserted
- check this button if the first page of
the specified PDF will be inserted automatically after every existing page.
-
- When condition
- Specfiy the condition number of the page where the
specified PDF page is
applied, the default 0
specifies any condition number. Use the [Text] page
to set condition-numbers.
- On copy number
- Specify the copy number of the page where the specified PDF
page is
applied, the default 0
specifies every copy number. Use the [Convert] page
to create copies of pages in the spooled-file.
Use the fonts page to specify the font size and type for selected areas
of text.
Use the numbered tabs at the top of this page to specify the up to
twenty
selected areas of text.
The controls on this page apply only to "un-transformed" *SCS
spooled-files
The default unit-of-measure is
points
(one 72nd of an inch)
but you may select a different unit-of-measure on the
Paper page
of the configuration or markup form.
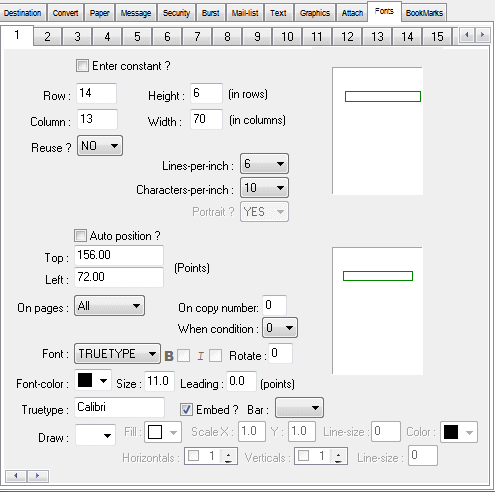
- Enter constant ?
- Check this box when you want to specify constant text which
will be added to
each page of the PDF. When the box is checked, an edit-control is shown
and you may enter multiples lines of constant text into this control.
When the box is unchecked, an "example" input page is shown, with a
rectangular
box around the selected text area.
- Row
- Specify the start row for text selection.
- Height
- Specify the height (in rows) of the selected
text.
- Column
- Specify the start column for text selection.
- Width
- Specify the width (in columns) of the selected
text.
- Lines per inch
- Adjusts the dimensions of the "example" page to reflect the
spooled-file to be processed.
- Characters per inch
- Adjusts the dimensions of the "example" page to reflect the
spooled-file to be processed.
- Portrait
- Adjusts the orientation of the "example" page to reflect
the spooled-file to be processed.
- Auto Position
- Check this box if you want PDFing to output selected text
at the original position
on the page. Leave this box unchecked if you want to specify a
different output position.
The selected output position position is indicated by a rectangle on
the output "example page".
- Top
- Specify the topmost position (in current units-of-measure)
where the selected text is output.
- Left
- Specify the leftmost position (in current units-of-measure)
where the selected text is output.
- On pages
-
Specify on which pages the font is to be applied.
- First
- select if the font is to be applied only on the
first page of the PDF.
- All
- select if the font is to be applied on every page.
- Last
- select if the font is to be applied only on the
last
page.
- Not-Last -
select if the font is to be applied on
every page except the
last page.
- Not-First - select if the font is to be applied on
every page except
the first page.
- On copy number
- Specify the copy number of the page where the specified
font
is applied, the default 0
specifies every copy number. Use the [Convert] page
to create copies of pages in the spooled-file.
- When condition
- Specify the condition number of the page where the
specified font is
applied, the default 0
specifies any condition number. Use the [Text] page
to set condition-numbers.
- Font
- Select the name of the font to be used for the selected
text. The font may be one of the
fonts "built-in" to PDF files or truetype. If
truetype is selected a font
dialog-box is displayed which allows you to specify the font-name,
style and size.
- B
- Specify the weight of the "built-in" font.
- I
- Specify the italic style of the "built-in" font.
- Rotate
- Specify the rotation (in degrees) of text rendered in this
font. The default value of 0
specifies no rotation.
- Font-colour
- Click on this box to select the colour of the font to be
used for the selected text.
- Font-size
- Specify the size of the "built-in" font, in points. As the
size is adjusted you
will see that the size of the rectangle on the output "example page" is
adjusted accordingly. A zero font size will cause the selected text to
be removed from the output PDF.
- Leading
- Specify the distance (in points) between each line of text
rendered in this font.
- Truetype
- Shows the name of the selected truetypefont.
- Embed
- Check this box, if you want the selected truetype font to
be "embedded" in the PDF.
Embedding a font increases the size of the PDF file, but ensures it can
be read by
those who do not have the selected font installed on their system.
- Bar
- Specify that the selected font is a barcode font and that a
check-sum be calculated
for the text that is to be renderet and that stary/stop
charactersare added when required. The options are:
-
- 128 - code 128.
- 128b - code128 subcode-b.
- 39 -
code39.
- 39cs - code39 with
checksum.
- Draw
- Select lines to be drawn around the selected text. The
selected line-drawing will
be automatically sized to fit around the selected text.
- Fill
- Click on this box to select the colour that will fill the
rectangular area within
the line-drawing.
- ScaleX
- Enter a value greater or less than one in order to increase
or decrease
the width of the line-drawing. The left origin of the shape will be
automatically adjusted,
so that the line-drawing continues to be centered around (or inside)
the selected text.
- ScaleY
- Enter a value greater or less than one in order to increase
or decrease the height of
the line-drawing. The top origin of the shape will be automatically
adjusted,
so that the line-drawing continues to be centered around (or inside)
the selected text.
- Line-size
- Specify the size (in points) of the lines outlining the
drawing.
- Line-colour
- Click on this box to select the colour of the lines
outlining the drawing.
Use the bookmarks page to specify where the text for each PDF bookmark
is found
in the spooled-file. For each different text-string extracted from the
spooled-file
page, PDFing will create a book-mark on the same page of the PDF.
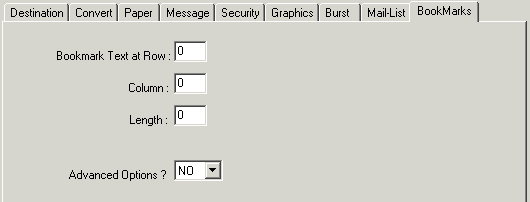
- Bookmark Text at Row
- Specify the row of the spooled-file text that contains the
"bookmark-text".
When non-blank text is extracted from the row, it is used to create a
PDF book-mark.
- Column
- Specify the column of the spooled-file text that contains
the "bookmark-text".
- Length
- Specify the length of the "bookmark-text". If the text
contains included blanks,
the length must be set to a non-zero
value.
- Advanced Options ?
- Select YES to see the
additional controls that allow
you to specify parameter values for complex bookmarking tasks.
 Markup Files for
PDFing
Markup Files for
PDFing