 Printing
from PDFing
PDFing can automatically print the PDF files it creates to any windows
printer,
You may notice the "tickler" text added to each printed page.
In order to remove this text, you must apply a valid
NT Service
license-key.
Use the
[EditPrinter] button
on the
[Destination] page
of the
Configuration
and
Markup forms
to display the
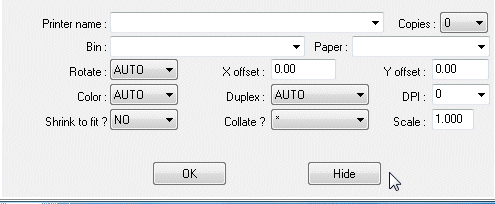
following sub-form. When it is
displayed, use the
[OK] button
to apply changed specifications and hide the sub--form, or
[Hide] to hide the
sub-form without applying changed specifications.

The controls on the sub-form are:
- Printer name :
- You may select or enter the name of a windows printer. If
no printer is selected,
then the default printer will be used.
- Copies :
- You may you to select from zero to nine copies of the
print-out.
If you want a PDF to print, you must select some number of copies
greater than zero.
- Rotate :
- You may select AUTO
for "best
fit", 0, 90, 180 or 270 degrees of
rotation .
- X offset :
- You may enter a value in points (1/72 inch) to offset the
document page to the
right of the paper.
- Y offset :
- You may enter a value in points (1/72 inch) to offset the
document page to the
bottom of the paper.
- Tray :
- Select the tray from which paper is loaded.
You may enter either the name or number of the tray. A blank entry
selects
the default tray of the printer.
- Bin :
- Select the bin into which the printed paper
is dumped. You may enter either the name or number of the bin. A blank
entry selects the default bin of the printer.
- Color :
- Force either color or monochrome printing,
this is sometimes required for network printers. The default, AUTO,
selects the default color mode of the printer.
- Duplex :
- For printers that support double-sided printing,
the default, AUTO, selects the default duplexing
method of the selected printer. The SIMPLEX
selection switches double-sided
printing off.
- DPI :
- Select the quality of printed output
in terms of dots-per-inch. A zero entry selects the default
dots-per-inch setting of the printer.
- Shrink to fit ?:
- Select YES
to
fit the document page-size to fit the paper, NO for no automatic
fitting, or EXPAND
to increase the document page size to fit the printer..
- Collate :
- For printers that support collating, the default, AUTO,
selects the default page collating method of the selected printer,
selecting NO switches
collation off.
- Scale :
- Specify a ratio less than 1.00 to shrink the
document
pages, or greater than 1.00
to expand the document pages. A value of 1.0 means actual size, 0.5
means half-size, 2.0 means double-size etc.
For your convenience, when the
sub-form is hidden, then the "Printer name" control will
"hint" the printer address string and this string can also be copied
from the control.
A printer address string (see below) may be specified as
the value for any of the following
tags.
-
EMA= email address (the prefix "-p" is required)
- EMN= notification address (the prefix
"-p" is required)
- EPN= printer-name (the prefix "-p" is
optional)
When
*LIST*
is specified for the
EPN= value,
only
printer addresses will be selected.
When
*LIST* is
specified for the
EMA= or
EMN=
values
all addresses
(including any printer addresses) will be selected.
A printer address is a text string of printing parameters, it
may specified for printer tags (see above) or in the "Send to" and
"Notify" edit-controls. In cases where you need to distinguish
between a printer-name and other document
destinations you must prefix printer names with
-p but when
a
printer address is specified in an edit-control
or instruction tag which can only specify a printer
address, the prefix
-p
may be omitted. After the (optional) prefix
-p you may
specify any of the following printing parameters:
- an,
- Shrink PDF page - n=0 shrink to fit paper (default), n=1
no shrinking, n=2 expand to fit paper
- cnn,
- Number of copies
- ccnn,
- Number of copies, copies are generated by the printer-driver
- fc,
- Force color
- fm,
- Force monochrome
- tname,
- Tray name or number
- bname,
- Bin name or number
- dv,
- Duplex vertical
- dh,
- Duplex horizontal
- ds,
- Duplex simplex or off
- ln,
- Collation - n=1 collate pages, n=2 no collation
- o0,
- Rotate by 0 degrees, switches automatic rotation off
- o90,
- Rotate by 90 degrees, switches automatic rotation off
- o180,
- Rotate by 180 degrees, switches automatic rotation off
- o270,
- Rotate by 270 degrees, switches automatic rotation off
- qnnnn,
- Quality in dots per inch
- rn-n,
- Range of pages to print. Where "r2"
prints page 2 only, "r2-4"
prints pages 2 through 4 and "2-" prints pages 2
through to the last page.
- sn.nn,
- Scaling Where s1.0
means actual size, s0.5 means
half-size, s2.0
means double-size et.
- xnnnn,
- Offset to right (points)
- ynnnn,
- Offset to bottom (points)
Note that each separate parameter must
be terminated by a comma ","
character. The text after the last comma "," character is the printer
name. So an example of a printer address looks like:
-p c2,fm, q1200, HP LaserJet
Which directs PDFing to print two copies
to an HP LaserJet at 1200 dots-per-inch
in monochrome. Or:
-p c1,
Which directs PDFing to print one copy to the default printer. Note the
terminating ,
(comma) after the final parameter, this signals PDFing that c1 is
a parameter not the
name of a printer.

- Printer look-up:
- Select one of the pre-defined special values: *FILENAME,
*USERPRF, *FORMTYPE
or *USERDATA and the corresponding attribute value
from each spooled-file will be
used to select any corresponding printer-name(s) from the mail-list
specified below.
You may also enter special
characters here,
so that a spooled-file with particular attribute values is printed on
particular printer(s).
- In mail-list:
- Select the Mail-List
used to look-up the printer names corresponding to the Printer
look-up value. Leave this control blank
to use the Mail-List with the same name as the markup file.
- Default:
- Select the default printing action to be taken when no
printer-name is found in the mail-list.
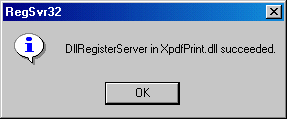
Because the printing component is an "ActiveX/Com",
PDFing will attempt to register the component during installation. If
this cannot
be performed at installation, PDFing will automatically locate
and try to "register" the printing component when you use the
printer controls.
Alternatively, you can
run (as Administrator)
the batch-file:
\PDFing\Res\XpdfPrintInstall.bat to register the
component.
 Printing
from PDFing
 The controls on the sub-form are:
